What is Request?
This documentation is in awful incomplete state, but we are diligently working on making it useful!
Stay calm
- the developer
Request for Mirror is a package that extends functionality of Mirror Networking for Unity Engine, allowing you to define and handle http-like requests with automatic callbacks on response. Get Started

Currently there are two types of requests: Fetch<TRequest> and Post<TRequest,TResponse>.
They mimic GET and POST functionality from Http protocol respectively:
Fetch comes with no request body and Post should have some data sent to the server.
How this Works
Under the hood this package uses Mirror’s high level [Command]’s
and [TargetRPC] calls to exchange data between server and client, with a catch
to make it possible to use in derived classes.
Creating a request with Request
To define a new request type, just create a new class and derive it from Fetch or Post
// Without request body, just fetching a response
public class Req_Example : Fetch<string>
{
    //called on CLIENT
    private void OnConnectedToServer()
    {
        Send(response => Debug.Log(response),
        error => Debug.LogError("Something went wrong: " + error));
    }
    //called on SERVER
    protected override void OnRequest(out RequestStatus status)
    {
        res.SetResponse("Hello World!");
        status = OK;
    }
}
Generic type Parameters Are:
- For Post:
Post<RequestType, ResponseType1, ResponseType2, ResponseType3, ResponseType4>Responses 2..4 are optional.
- Fetch has a single generic type parameter which defines the Response Type for this request.
RequestType is what server accepts as request data.
ResponseType is what client expects to get back from server as a response.
(as we specify string as response type in the example above)
Why use Request instead of standard Mirror workflow?
Imagine there’s some data you need to get from a server, but you don’t want to synchronize it with [SyncVar]s repeatedly (if that data is rarely needed or to restrict access to data by some conditions to prevent cheating).
Then there are two possible solutions:
- Interest Management - this is too complex for simple things
- Making a pair of Command (to send data) and an RPC (to receive a response) - this becomes messy if you have a lot of requests to handle, and it’s just exhausting to try to keep everything consistent in terms of naming and functionality. Resulting method pairs still look too decoupled after all.
- Using lower level Network Messages - but we want something dead simple, right?
Don’t be overwhelmed! The only thing that is actually required to handle the request on server is the OnRequest function. The OnConnectedToServer method is just how we send the request from client right after it connects to a server.
Let’s break down this example:
public class Req_Example ...- We name this class with
Req_prefix so it will be highly distinguishable from regular classes. That underscore usage is unconventional naming so it’s up to you whether you would use it.
... : Fetch<string>- We derive from Fetch class and set a response type for this particular request as
stringusing angle brackets.
private void OnConnectedToServer()
{
    Send(response => Debug.Log(response));
}- in
OnConnectedToServer, which is called on client, we send the request and pass a callback: “what to do after we get a response”, so in this case we just print the response we get to console.
error => Debug.LogError("Something went wrong: " + error)- The second callback is what we do if server denies a request. That does not include connection errors or any other Mirror’s exceptions. This is just for when we decide to deny the request and send an error message instead of a response.
protected override void OnRequest(out RequestStatus status)
{
    res.SetResponse("Hello World!");
    status = OK;
}- in
OnRequest(called on SERVER) we should process the request in some way. This time we will just set the response as “Hello World” string.
status = OK;- We should pass the
statusvariable out, so now nothing could get wrong so we set it to the pre-definedOKproperty which means there were no errors and response should be sent.
It’s hard to find a consistent approach if you have a lot of
Since NetworkBehaviours don’t have generics support, we came up with a workaround: every time you create a new request type
(Todo: we’re working on the lower-level implementation based on mirror’s network messages - [watch our progress])
When you create a request, deriving from a request baseclass,
Installation
There are multiple ways to install Request.
We recommend using it as Unity Package Manager (UPM) Git dependency:
1. Recommended Method (UPM Git Dependency)
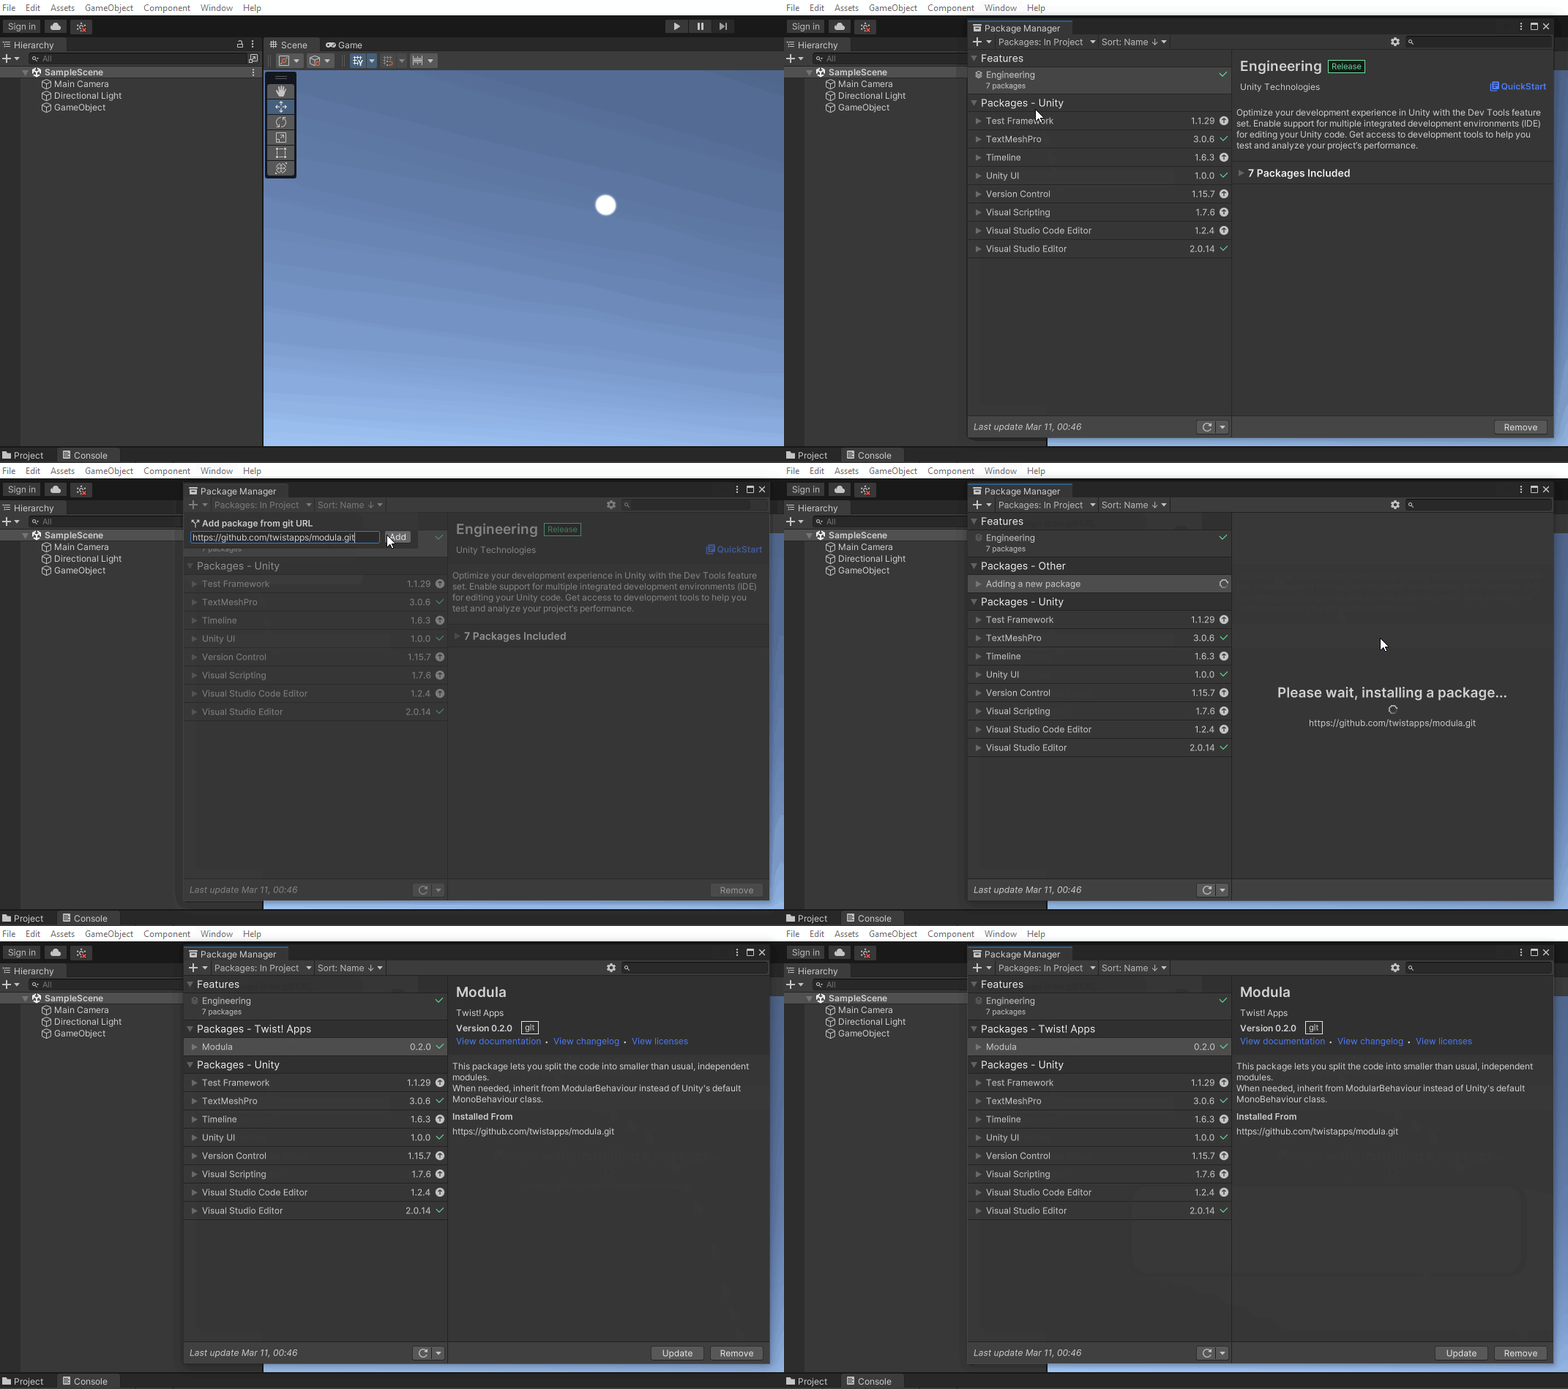
- In Unity, go to Window ▶ Package Manager
- Click ”+” ▶ Add Package from Git URL…
- Paste this link:
https://github.com/twistapps/request-for-mirror.git - Wait for unity to download the package for you!
 Click on the image to see in full screen
Pros & Cons
- Faster updates: don’t need to wait for Unity team to approve the package. Download updates right when they’re ready and published
- “Under the Hood” usage: no code in your
Assets/folder at all.
con: it’s not so straightforward to dig into the source code because it’s hidden in
Packages/ folder.
Choose this method if you want Modula to work under the hood without littering your Assets/ folder.
There are other installation methods listed at “Installation” page.
Updating
Check out the full page to read the update instructions.
Next Steps
Create your first request by following Quick Start instructions.
